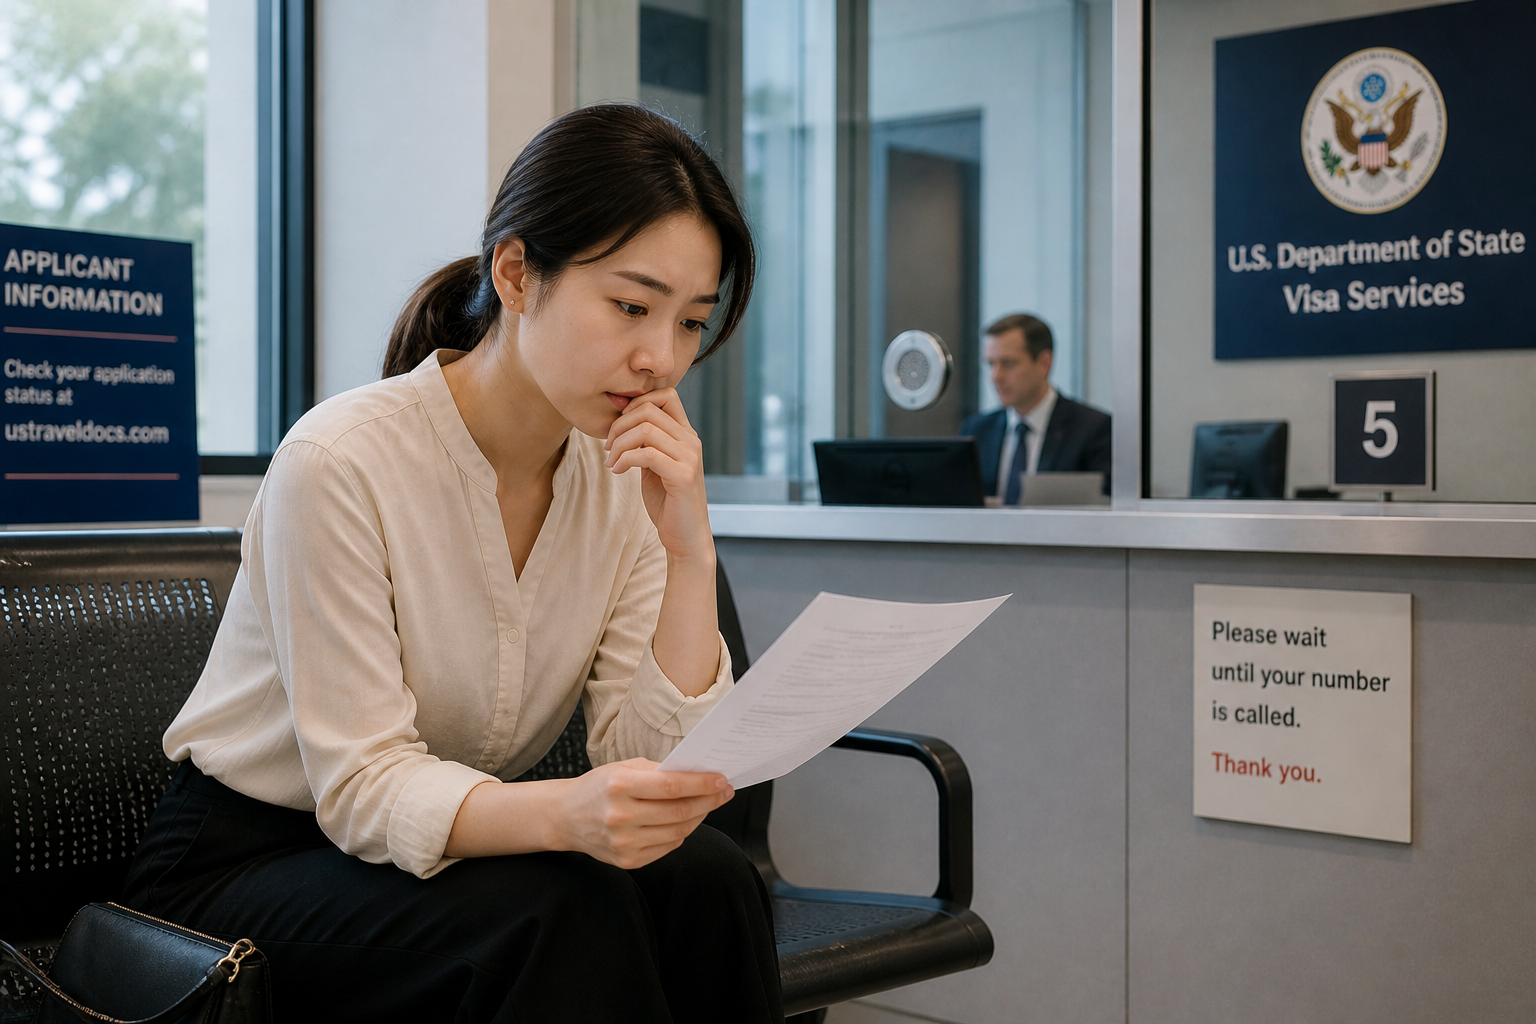
After your U.S. visa interview, it is normal to feel nervous while waiting for the result. Some applicants receive their passport quickly, while others may need to wait longer because the case is still under review.
The good news is that you can check your U.S. visa application status online through the official CEAC website.
This guide explains how to check your visa status, what common status messages may mean, and what you should do while waiting.
What Is CEAC?
CEAC stands for the Consular Electronic Application Center. It is operated by the U.S. Department of State and allows visa applicants to check the status of their visa application online.
You can use CEAC to check both immigrant visa and nonimmigrant visa cases. For nonimmigrant visas, such as B1/B2, F-1, H-1B, E-2, L-1, O-1, and other temporary visa types, applicants usually use their DS-160 application information to check the status.
The DS-160 is the online nonimmigrant visa application form used for temporary travel to the United States. Consular officers use the DS-160 together with the visa interview to review the applicant’s eligibility.
Where Can You Check Your Visa Status?
Where Can You Check Your Visa Status?
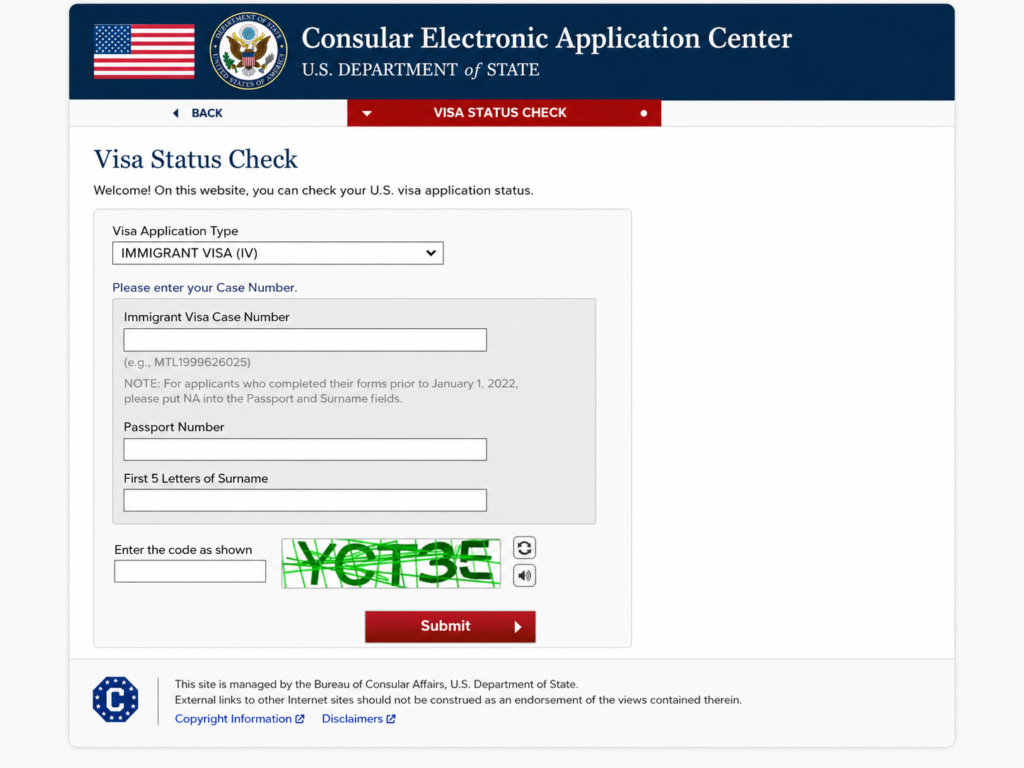
You can check your visa status on the official CEAC Visa Status Check website.
Go to the CEAC Visa Status Check page and select the correct visa application type.
For most temporary visa applicants, choose:
Nonimmigrant Visa (NIV)
Then you will usually need to enter:
The location where you applied
Your DS-160 Application ID or case number
The security code shown on the page
After submitting the information, the system will show your current visa case status. The official CEAC page states that applicants can check their U.S. visa application status through this website.
Common U.S. Visa Status Messages
After your interview, you may see different status messages. The exact meaning can depend on your case, but these are some common examples.
Application Received
This usually means your application has been received and is being processed. It does not necessarily mean your visa has been approved or denied.
At this stage, you may simply need to wait.
Approved
This generally means the consular officer has approved your visa application. However, your visa still needs to be printed and placed in your passport.
You should continue to wait for passport delivery or pickup instructions.
Issued
This is usually the status applicants want to see. “Issued” generally means the visa has been printed or is ready to be placed in the passport.
If your status says “Issued,” your passport may be returned soon, depending on the delivery or pickup method you selected.
Refused
This status can be confusing. A “Refused” status does not always mean the case is permanently denied.
In some cases, it may mean the application is refused under additional processing or because more information is needed. The Department of State previously updated CEAC so that some cases that used to show “Administrative Processing” may now show as “Refused.”
If your case says “Refused,” carefully review any email or paper notice you received from the embassy or consulate. That notice may explain whether additional documents are required or whether the case is closed.
Administrative Processing
Administrative processing means the case needs additional review. This can happen for many reasons and does not automatically mean there is a problem.
Processing times can vary. Some cases are resolved quickly, while others take longer.
What Should You Do While Waiting?
After the interview, the most important thing is to check your email regularly and follow any instructions from the embassy or consulate.
You should also:
Keep your DS-160 confirmation page and appointment confirmation
Check your visa status only on the official CEAC website
Watch for emails from the embassy, consulate, or passport delivery service
Do not make final travel plans until your passport with the visa is returned
Respond quickly if additional documents are requested
Can You Travel Before the Visa Is Issued?
You should not make final travel arrangements until your visa is issued and your passport is returned.
Even if the officer says your visa is approved at the interview, the visa still needs to be processed and printed. Delays can happen, so it is safer to wait until you physically receive your passport.
What If Your Passport Is Taking Longer Than Expected?
If your case has been approved but your passport has not arrived, first check the CEAC status. Then check the delivery tracking system used by the embassy or consulate where you applied.
If the delay continues, follow the contact instructions provided by the embassy or consulate. Each location may have different procedures for passport delivery and case inquiries.
Final Thoughts
Waiting for a U.S. visa result can be stressful, especially if you have travel plans, school start dates, or work schedules. Checking your visa status through CEAC can help you understand where your case stands.
However, online status messages can sometimes be confusing. Always read any official notice from the embassy or consulate carefully, and follow the instructions given for your specific case.
This article is for general informational purposes only and is not legal advice. Visa processing can vary depending on the applicant, visa type, embassy or consulate, and case history.
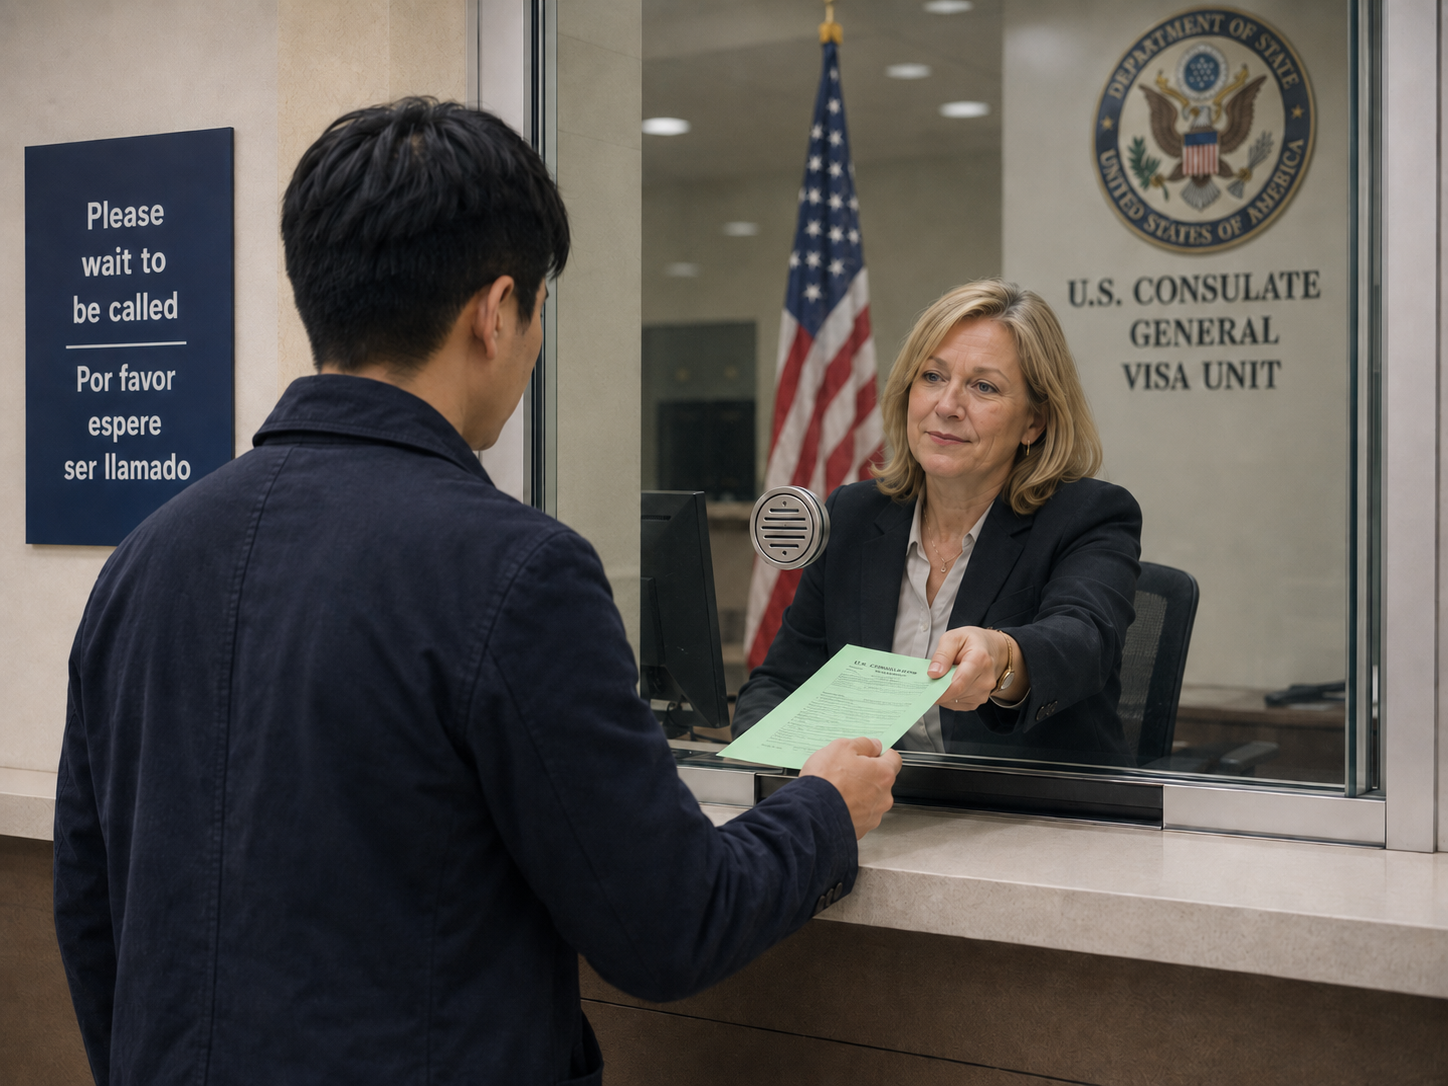
If you recently attended a U.S. visa interview and received a 221(g) notice, you may be confused about what it means.
In many cases, the consular officer explains at the interview that additional documents, additional review, or administrative processing is required before the visa can be issued. Even when the officer explains the situation, many applicants become worried after checking their visa status online and seeing “Refused” on CEAC.
This can be stressful, especially if the applicant was not told that the visa was permanently denied.
The important thing to understand is that a 221(g) refusal does not always mean the visa has been permanently denied. In many cases, the application may still move forward after the applicant submits requested documents or after the embassy or consulate completes additional review.
The U.S. Department of State explains that when a case is refused under 221(g), a consular officer may later reconsider the application based on additional information or after administrative processing is completed. (Travel.state.gov)
This article explains what 221(g) means, why it happens, why CEAC may show “Refused,” and what applicants should do next.
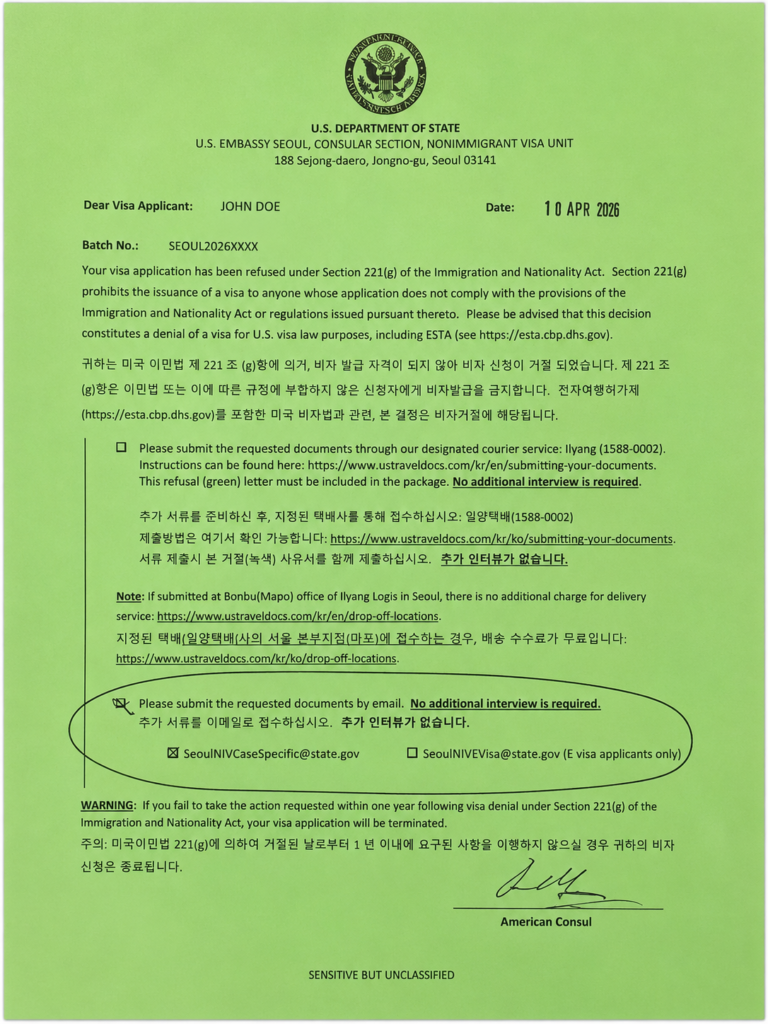
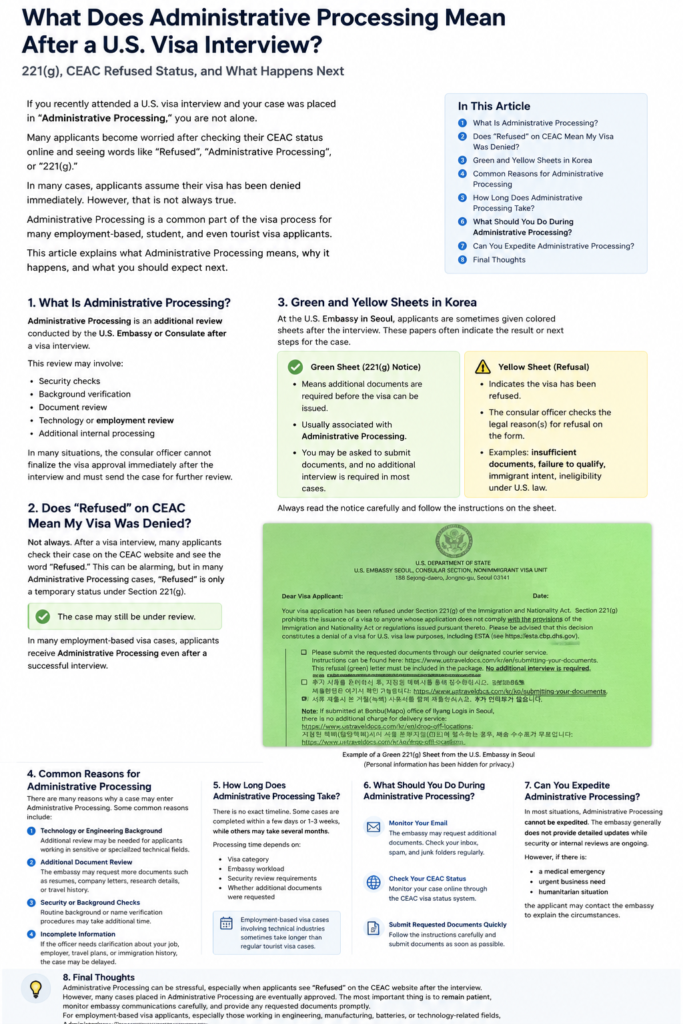
Example of a green 221(g) notice. In many cases, this type of notice means the applicant must submit additional documents or wait for further review before the visa can be issued. Approved applicants usually do not receive this type of sheet.
What Is 221(g)?
221(g) refers to a section of the Immigration and Nationality Act used in visa cases when the consular officer cannot issue the visa at that time.
A 221(g) refusal may happen when:
the application is missing required documents
the officer needs more information
additional administrative processing is required
background or security checks are needed
the officer cannot yet determine whether the applicant qualifies for the visa
The Department of State explains that when a visa application is denied under 221(g), it may mean the consular officer does not have all the information needed to determine eligibility, or that additional administrative processing is required. (Travel.state.gov)
In simple terms, 221(g) usually means:
“Your visa cannot be issued yet.”
It does not always mean:
“Your visa is permanently denied.”
Does 221(g) Mean My Visa Was Denied?
Not necessarily.
This is one of the most confusing parts of the visa process.
Legally, a 221(g) case is considered a refusal at that moment. That is why CEAC may show the case status as “Refused.” However, the case may still continue if the applicant submits the requested documents or if the embassy or consulate completes the required review.
The Department of State has explained that some CEAC cases previously shown as “Administrative Processing” are now shown as refused under Section 221(g), and that the status may later change if the applicant is found eligible or if outstanding issues are resolved. (Travel.state.gov)
So if your CEAC status says Refused after receiving a 221(g) notice, you should carefully review the notice and follow the embassy or consulate’s instructions.
Why Did I Receive a 221(g) Notice?
There are many reasons why a visa applicant may receive a 221(g) notice.
Common reasons include the following.
1. Missing or Incomplete Documents
The embassy or consulate may need additional documents before it can continue processing the case.
Examples may include:
updated resume or CV
employment verification letter
company support letter
financial documents
travel history
prior visa records
relationship evidence
school or employment records
business documents
supporting company documents
If documents are requested, the applicant should submit exactly what the notice or instruction sheet asks for.
2. Additional Administrative Processing
Some cases require additional internal review after the interview.
This is commonly called Administrative Processing.
Administrative processing may involve background checks, security review, employment review, technology-related review, or other internal government processing.
When administrative processing is required, the consular officer will usually inform the applicant at the end of the interview. Processing time varies depending on the individual case. (Travel.state.gov)
3. Technical or Specialized Employment Background
Applicants who work in technical or specialized industries may sometimes receive additional review.
This may include fields such as:
engineering
batteries
semiconductors
advanced manufacturing
chemical technology
artificial intelligence
research and development
defense-related industries
In employment-based visa cases, the embassy or consulate may want to better understand the applicant’s job duties, technical background, employer, project, or purpose of travel.
4. Unclear Job Duties or Company Information
A 221(g) notice may also be issued if the consular officer needs more information about the applicant’s employment.
This may happen when the officer needs clarification about:
what the applicant will do in the United States
who the U.S. employer is
how the foreign company and U.S. company are related
why the applicant is needed in the United States
whether the applicant qualifies for the requested visa category
what project the applicant will support
whether the applicant will train U.S. workers
This is common in employment visa cases where job duties, company structure, or project details must be clearly explained.
5. Prior Immigration or Visa Issues
Some applicants may receive additional review because of prior immigration history.
Examples may include:
previous visa refusal
prior overstay
prior removal or deportation issue
inconsistent information in past applications
prior criminal or security-related concern
In these cases, the applicant should be very careful before submitting any response.
Green Sheet, Refusal Worksheet, and 221(g)
In many visa interviews, applicants who receive a 221(g) notice may be given a colored sheet, a written notice, a refusal worksheet, or a separate instruction sheet.
A green sheet is often associated with additional documents or further review.
However, the specific document request may not always appear directly on the green sheet itself. In some cases, the green sheet may provide general 221(g) instructions, while a separate refusal worksheet or instruction sheet lists the specific documents requested.
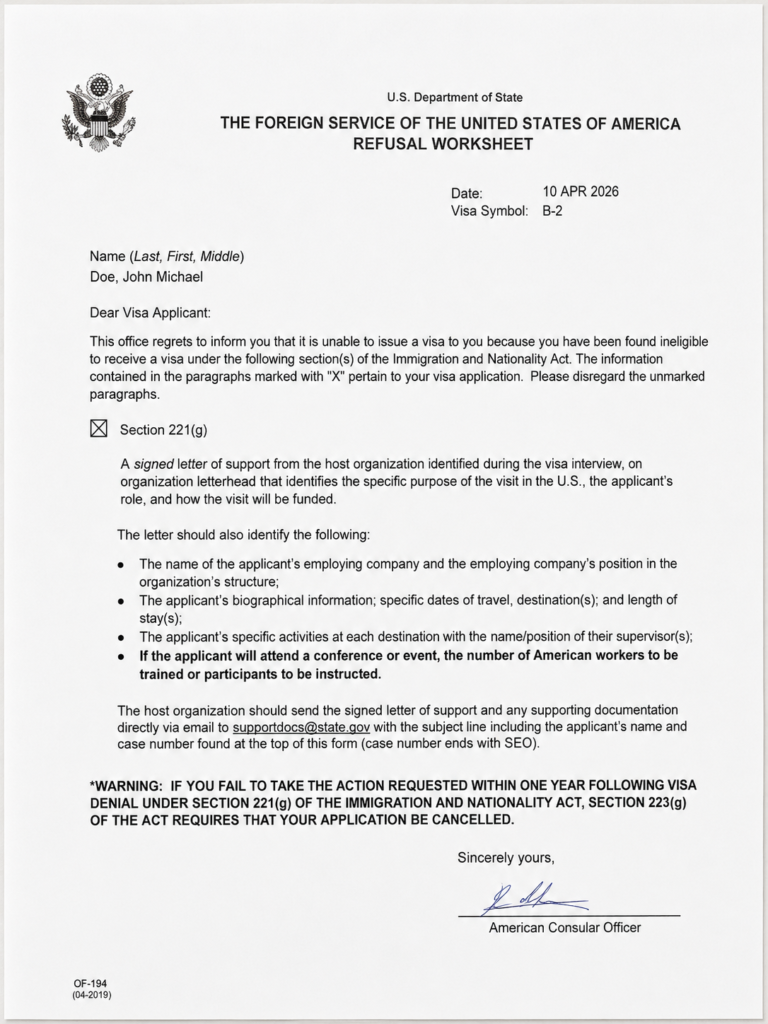
For example, an applicant may receive a separate worksheet asking for a signed support letter, company information, travel details, project information, or other supporting documents.
In many cases, the consular officer explains at the interview why the 221(g) notice is being given and what the applicant needs to submit. The applicant should carefully review every document received after the interview, including any colored sheet, refusal worksheet, email instruction, or courier instruction.
This is an example of a separate 221(g) refusal worksheet. In some cases, the green sheet provides general instructions, while a separate worksheet lists the specific documents or information requested by the consular officer.
Applicants who are approved at the interview usually do not receive a green sheet. In many approved cases, the officer simply informs the applicant that the visa has been approved, and the passport is later returned with the visa.
A green 221(g) sheet usually means the case is not ready for final issuance yet. It does not automatically mean the visa has been permanently denied.
In many green sheet cases, the notice may state that no additional interview is required. This usually means the applicant only needs to submit the requested documents according to the embassy or consulate’s instructions.
What Should I Submit After Receiving 221(g)?
Applicants should carefully follow the instructions given by the embassy or consulate.
Do not assume that every 221(g) case requires the same documents. The correct response depends on the specific notice, worksheet, or instruction received after the interview.
If the embassy or consulate asks for additional documents by email, the email should clearly identify the case.
The email should usually include:
full name
date of birth
passport number
visa interview date
visa category
case number, if available
Applicants should also attach:
the requested documents
a copy of the 221(g) notice or green sheet
a copy of any refusal worksheet or instruction sheet received
a copy of the passport biographic page
signed Form G-28, if represented by an attorney
Including a copy of the 221(g) notice, green sheet, or refusal worksheet helps the embassy or consulate identify what was requested and match the submission to the correct case.
If the applicant is represented by an attorney, a properly signed Form G-28 should also be included. This allows the attorney to communicate with the government on behalf of the applicant and may help ensure that the response is properly reviewed.
Before submitting documents, make sure they are:
complete
clear
accurate
properly translated, if required
consistent with the visa application and interview answers
organized according to the embassy or consulate’s instructions
A well-organized response does not guarantee approval, but it may help the embassy or consulate review the case more efficiently.
How Long Does 221(g) Take?
There is no exact timeline.
Some 221(g) cases are resolved within a few days or weeks. Others may take several months.
The timeline may depend on:
visa category
embassy or consulate workload
whether documents were requested
how quickly the applicant responds
whether administrative processing is required
whether security or background checks are involved
whether the case involves employment, technology, or company review
The Department of State notes that the duration of administrative processing varies based on the individual circumstances of each case. (Travel.state.gov)
Applicants can check their visa status through the official CEAC Visa Status Check website, which is managed by the U.S. Department of State’s Consular Electronic Application Center. (CEAC)
Many 221(g) cases are later approved after the embassy or consulate receives the requested documents or completes administrative processing.
The Department of State explains that a consular officer may reconsider a 221(g) refusal at a later date based on additional information or after administrative processing is resolved. (Travel.state.gov)
However, approval is not guaranteed.
The final decision depends on whether the applicant qualifies for the visa and whether all legal and documentary requirements are satisfied.
What Should You Not Do After 221(g)?
After receiving a 221(g) notice, applicants should avoid common mistakes.
Do not:
ignore the notice
submit incomplete documents
send unclear or disorganized files
submit inconsistent information
wait too long to respond
assume the case is permanently denied without reading the notice
rely only on CEAC status without reviewing the actual notice
repeatedly email the embassy without following instructions
The most important step is to carefully read all instructions and submit exactly what is requested.
When Should You Consider Legal Help?
Applicants may want to consider speaking with an immigration attorney if:
the 221(g) notice requests complicated documents
the case involves technical or sensitive employment
the applicant has prior visa refusals
the applicant has prior overstays or immigration violations
the case has been pending for a long time
the applicant is unsure how to respond
the refusal worksheet requests company or project documents
the notice lists a specific legal ground beyond 221(g)
Employment-based cases involving company documents, technical job duties, specialized knowledge, or investment projects may require a carefully prepared response.
Final Thoughts
Receiving a 221(g) notice after a U.S. visa interview can be stressful, especially when CEAC shows the case as Refused.
However, 221(g) does not always mean the visa has been permanently denied.
In many cases, the embassy or consulate needs additional documents, additional review, or administrative processing before making a final decision.
Applicants should carefully review every document received after the interview, including any green sheet, refusal worksheet, instruction sheet, or email from the embassy or consulate.
The best thing applicants can do is submit the requested documents clearly and promptly, include identifying information with the submission, and monitor email and CEAC status updates.
For applicants who received a green sheet, remember that approved applicants usually do not receive a green sheet. A green 221(g) sheet usually means the case needs additional documents or further review before the visa can be issued.
Disclaimer: This article is for general informational purposes only and does not constitute legal advice. Every visa case is different. Applicants should review their own embassy or consulate notice carefully and consult with an immigration attorney if they need legal advice about their specific situation.
If you recently attended a U.S. visa interview and received a green 221(g) sheet, the consular officer most likely explained that additional documents or further review are required before your visa can be issued.
In many cases, the officer explains why the green sheet is being given and what documents need to be submitted. The sheet itself usually provides instructions for the next step.
However, many applicants still become worried after checking their visa status online through CEAC and seeing words like:
Refused
Administrative Processing
221(g)
This can be confusing because the applicant was not necessarily told that the visa was permanently denied. Instead, the officer may have explained that the embassy or consulate needs additional documents, additional review, or further processing before making a final decision.
In many approved visa cases, applicants do not receive a green sheet. The officer may simply inform the applicant that the visa has been approved, and the passport is later returned with the visa.
A green 221(g) sheet is usually given when the case is not ready for final issuance yet.
This article explains what Administrative Processing means, why your CEAC status may show “Refused,” what a green 221(g) sheet means, and what you should do next.
What Is Administrative Processing?
Administrative Processing is an additional review conducted by the U.S. Embassy or Consulate after a visa interview.
This review may involve:
security checks
background verification
document review
employment or technology-related review
additional internal processing by the embassy
In many situations, the consular officer cannot issue the visa immediately after the interview. Instead, the officer may place the case into Administrative Processing until the required review is completed.
This does not always mean the visa will be denied. It means the case is not ready for final approval at that moment.
Does “Refused” on CEAC Mean My Visa Was Denied?
Not always.
This is one of the most confusing parts of the visa process.
After a visa interview, some applicants check their case status on the CEAC website and see the word “Refused.” This can be alarming, but in many 221(g) Administrative Processing cases, “Refused” may be a temporary status while the case is still under review.
Under Section 221(g) of the Immigration and Nationality Act, a visa application may be refused temporarily if the officer needs additional documents, additional processing, or further review before the visa can be issued.
In other words, a 221(g) refusal does not always mean the case is permanently denied.
However, applicants should carefully read the notice they receive from the embassy because each case is different.
Green 221(g) Sheet After a U.S. Visa Interview
Applicants may receive a green 221(g) sheet when the consular officer needs additional documents or further review before the visa can be issued.
In many cases, the officer explains at the interview why the green sheet is being given and what the applicant needs to submit. The sheet itself usually includes instructions about the requested documents and how to submit them.
Applicants who are approved at the interview usually do not receive a green sheet. In many approved cases, the officer simply informs the applicant that the visa has been approved, and the passport is later returned with the visa.
A green sheet usually means the case is not ready for final issuance yet. It does not automatically mean the visa has been permanently denied.
The embassy or consulate may request items such as:
updated resume or CV
employment verification letter
company support letter
company documents
travel history
technical or research information
additional supporting evidence
In many green sheet cases, the notice may state that no additional interview is required. This usually means the applicant only needs to submit the requested documents according to the embassy or consulate’s instructions.
Yellow Sheet After a U.S. Visa Interview
A yellow sheet is different from a green 221(g) sheet.
In many cases, a yellow sheet is associated with a visa refusal or denial. The consular officer may mark or check the specific reason for the refusal on the notice.
This type of notice may be given when the officer determines that the applicant does not qualify for the visa at that time.
Common reasons may include:
insufficient documentation
failure to qualify for the requested visa category
immigrant intent concerns
prior immigration violations
prior visa overstays
criminal or security-related issues
other ineligibility under U.S. immigration law
Applicants who receive a yellow sheet should carefully review the exact reason marked on the notice. Unlike a green sheet, which often asks for additional documents or further review, a yellow sheet usually means the officer has identified a specific reason why the visa cannot be issued at that time.
However, the next step depends on the specific refusal reason. In some cases, the applicant may be able to reapply later with stronger evidence or corrected information. In other cases, the applicant may need a waiver or legal guidance before applying again.
Because every case is different, applicants should not assume that all yellow sheet refusals have the same solution. The marked reason on the notice is the most important starting point.
Common Reasons for Administrative Processing
There are many reasons why a visa case may be placed into Administrative Processing.
Some of the most common reasons include the following.
1. Technology or Engineering Background
Applicants working in technical industries may be more likely to experience additional review.
This can include fields such as:
batteries
semiconductors
engineering
advanced manufacturing
chemical technology
artificial intelligence
research and development
For example, employment-based visa applicants who work with battery manufacturing, semiconductor facilities, advanced equipment, or technical production systems may be asked to provide additional information about their job duties or technical background.
The embassy may want to better understand whether the applicant’s work involves sensitive technology or specialized technical knowledge.
2. Additional Document Review
Sometimes the embassy needs more documents before it can continue processing the case.
The applicant may be asked to provide:
updated resume or CV
employment verification letter
company support letter
detailed job description
company registration documents
project information
travel history
prior visa information
If the embassy requests documents, the applicant should follow the instructions carefully and submit the documents as soon as possible.
3. Security or Background Checks
Some Administrative Processing cases involve additional security or background checks.
This may happen because of:
the applicant’s work field
travel history
name check issues
prior immigration history
government or military-related background
other internal review requirements
Applicants with common names may also experience delays in some cases because additional verification may be required.
4. Incomplete or Unclear Information at the Interview
Administrative Processing may also happen if the officer needs clarification about the applicant’s case.
For example, the officer may need more information about:
job duties
employer information
purpose of travel
prior immigration history
relationship between companies
source of funds
business operations in the United States
This is why applicants should prepare clear and consistent answers before the visa interview.
How Long Does Administrative Processing Take?
Unfortunately, there is no exact timeline for Administrative Processing.
Some cases may be completed within a few days or a few weeks. Other cases may take several months.
The timeline depends on many factors, including:
visa category
embassy workload
type of review required
whether additional documents were requested
how quickly the applicant responds
whether security checks are involved
Employment-based visa cases involving technical industries may sometimes take longer than simple visitor visa cases.
Applicants should understand that the embassy usually cannot provide detailed updates while internal review is pending.
What Should You Do During Administrative Processing?
If your case is placed into Administrative Processing, there are several things you should do.
1. Read the Notice Carefully
If you received a green 221(g) sheet or any written notice, read it carefully.
Check whether the embassy is asking for:
specific documents
email submission
courier submission
passport submission
no additional interview
additional instructions
Do not assume every 221(g) case is the same. The instructions on your notice are very important.
2. Check Your Email Regularly
The embassy may contact you by email.
Make sure to check:
inbox
spam folder
junk mail folder
Sometimes applicants miss important embassy emails because the message goes to spam.
3. Submit Requested Documents Quickly and Clearly
If the embassy or consulate asks for additional documents, submit them as soon as possible and follow the instructions on the 221(g) notice carefully.
A delayed or incomplete submission may delay the entire case.
When sending documents by email, applicants should clearly identify their case in the email. The email should usually include:
full name
date of birth
passport number
visa interview date
visa category
case number, if available
Applicants should also attach:
the requested documents
a copy of the green 221(g) sheet received after the interview
a copy of the passport biographic page
Including the green 221(g) sheet helps the embassy or consulate identify what was requested and match the submission to the correct visa case.
If the applicant is represented by an attorney, a properly signed Form G-28 should also be included. This allows the attorney to communicate with the government on behalf of the applicant and may help ensure that the response is properly reviewed.
Before submitting the documents, make sure they are:
complete
clear
accurate
properly translated, if required
consistent with the visa application and interview answers
A well-organized and complete response may improve the chance that the case can move forward without unnecessary delay. It does not guarantee approval, but it can help the embassy or consulate review the case more efficiently.
4. Check Your CEAC Status
Applicants can check their visa status through the CEAC website.
The case status may change during processing. However, CEAC updates are not always detailed, and the status may remain the same for a while even if the case is still being reviewed.
Seeing “Refused” during a 221(g) process can be stressful, but it does not always mean the case is permanently denied.
Can You Expedite Administrative Processing?
In most cases, Administrative Processing cannot be expedited.
The embassy usually cannot bypass required internal checks or security reviews.
However, if there is a serious emergency, such as a medical emergency, humanitarian situation, or urgent business need, the applicant may contact the embassy and explain the situation.
Even then, expedite approval is not guaranteed.
When Should You Consider Legal Help?
Applicants may want to consider speaking with an immigration attorney if:
the case has been pending for a long time
the embassy requested complicated documents
the visa was refused for a specific legal reason
the applicant received a yellow refusal notice
there are prior immigration violations
the applicant is unsure how to respond to a 221(g) request
the case involves a technical or sensitive industry
A careful response can be important, especially when the embassy requests employment, company, or technical documents.
Final Thoughts
Administrative Processing can be stressful, especially when applicants see “Refused” on the CEAC website after the interview.
However, many 221(g) Administrative Processing cases are eventually approved after the embassy completes its review or receives the requested documents.
At the U.S. Embassy in Seoul, a green sheet is usually given when additional documents or further review are required. Applicants who are approved at the interview typically do not receive a green sheet.
The most important steps are to carefully read the embassy notice, monitor your email, submit requested documents promptly, and remain patient while the case is being reviewed.
For employment-based visa applicants, especially those working in engineering, manufacturing, batteries, semiconductors, or other technology-related fields, Administrative Processing is not uncommon.
Disclaimer: This article is for general informational purposes only and does not constitute legal advice. Every visa case is different. Applicants should review their own embassy notice carefully and consult with an immigration attorney if they need legal advice about their specific situation.
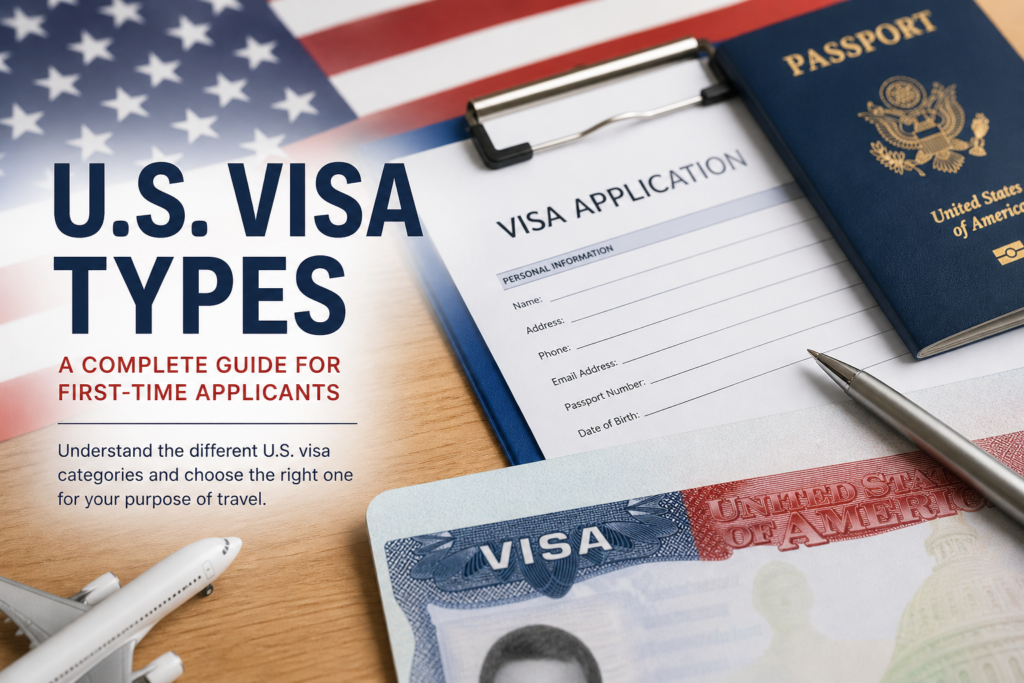
If you’re planning to visit the United States for the first time, understanding the visa system can feel confusing. Many applicants are unsure which visa category they should choose, especially since there are multiple options depending on the purpose of travel.
The U.S. visa system may seem complex at first, but once you understand the basic structure, it becomes much easier to navigate. This guide explains the major types of U.S. visas in a clear and practical way for first-time applicants.
Understanding the Two Main Visa Categories
All U.S. visas fall into two main categories: nonimmigrant visas and immigrant visas.
Nonimmigrant visas are for individuals who plan to stay in the United States temporarily. This includes tourists, students, and temporary workers.
Immigrant visas are for those who intend to live permanently in the United States. These visas typically lead to permanent residency, also known as a Green Card.
Understanding which category applies to your situation is the first and most important step.
Nonimmigrant Visas: Temporary Stay in the United States
Most applicants apply for nonimmigrant visas. These visas are issued for a specific purpose and for a limited period of time.
B Visas: Business and Tourism
The B visa is one of the most commonly issued U.S. visas.
The B1 visa is intended for business-related activities such as meetings, conferences, and negotiations. The B2 visa is used for tourism, visiting family, or receiving medical treatment.
Employment is not allowed under this visa category.
F and M Visas: Student Visas
Applicants who plan to study in the United States must apply for a student visa.
The F-1 visa is used for academic programs at universities or colleges. The M-1 visa is for vocational or technical training programs.
Applicants must first be accepted by a U.S. institution that is authorized to issue the required documentation.
H Visas: Temporary Work Visas
H visas are designed for individuals who want to work in the United States on a temporary basis.
The H-1B visa is widely used for specialized occupations such as engineering, technology, and finance. H-2A and H-2B visas cover seasonal work, while the H-3 visa is for training programs.
In most cases, a U.S. employer must sponsor the applicant.
J Visa: Exchange Visitor Programs
The J-1 visa is used for exchange programs that promote cultural and educational exchange.
This category includes interns, trainees, researchers, and other participants in approved exchange programs.
L Visa: Intra-Company Transfers
The L visa is intended for employees of international companies who are transferring to a U.S. office.
The L-1A visa applies to managers and executives, while the L-1B visa is for employees with specialized knowledge.
E Visa: Treaty Traders and Investors
The E visa is available to nationals of countries that have a treaty with the United States.
The E-1 visa is for individuals engaged in substantial trade, while the E-2 visa is for those who invest in a U.S. business.
Applicants must play an active role in managing the business.
O Visa: Individuals with Extraordinary Ability
The O visa is designed for individuals who have demonstrated exceptional ability in their field.
This includes achievements in science, arts, education, business, or athletics. Strong evidence of recognition is required.
K Visa: Fiancé(e) Visa
The K-1 visa allows a foreign fiancé(e) of a U.S. citizen to enter the United States.
The couple must marry within 90 days of arrival, after which the applicant may apply for permanent residency.
Other Specialized Visa Categories
In addition to the major visa types listed above, the United States offers several specialized visa categories for specific purposes.
These include transit visas for travelers passing through the U.S., crew visas for airline or ship employees, media visas for journalists, and visas for athletes, performers, and religious workers.
Although these categories are less commonly used, they are important for applicants whose situations do not fit standard visa types.
Immigrant Visas: Permanent Residence in the United States
Immigrant visas are intended for individuals who plan to live permanently in the United States.
Family-Based Immigration
This category allows U.S. citizens and permanent residents to sponsor certain family members.
Immediate relatives such as spouses, parents, and unmarried children are given priority, while other categories may have longer waiting periods.
Employment-Based Immigration
Employment-based immigrant visas are available for individuals with job offers or specific qualifications.
These categories include priority workers, professionals with advanced degrees, and skilled workers. Many require employer sponsorship and additional certification processes.
EB-5 Investor Visa
The EB-5 visa is designed for individuals who invest in the U.S. economy.
Applicants must meet minimum investment requirements and create jobs for U.S. workers. Successful applicants may become eligible for permanent residency.
Final Thoughts
Choosing the right U.S. visa depends on your purpose of travel and your long-term plans.
If you are visiting for a short period, a nonimmigrant visa will likely be the correct option. If you intend to live in the United States permanently, you should consider immigrant visa categories.
Understanding the overall structure of the visa system can help you make informed decisions and avoid common mistakes during the application process.
What to Read Next
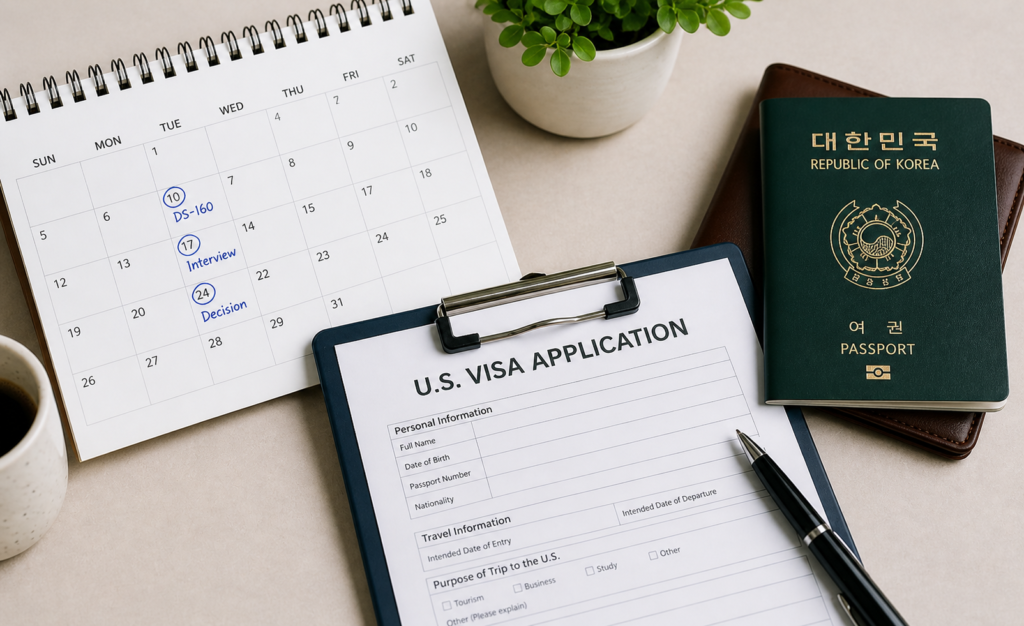
If you are new to the process, the next step is learning how to apply for a U.S. visa.
In the next guide, you will learn how to complete the DS-160 form, pay the visa fee, and schedule your visa interview.
This guide is based on general visa information and may change depending on U.S. immigration policies.
If you are planning to travel to the United States, one of the most important steps is applying for the correct visa. For many first-time applicants, the process can feel confusing because there are several steps involved.
The good news is that the U.S. visa application process follows a general structure. Once you understand each step, the process becomes much easier to manage.
This guide explains how to apply for a U.S. visa in a simple, step-by-step format.
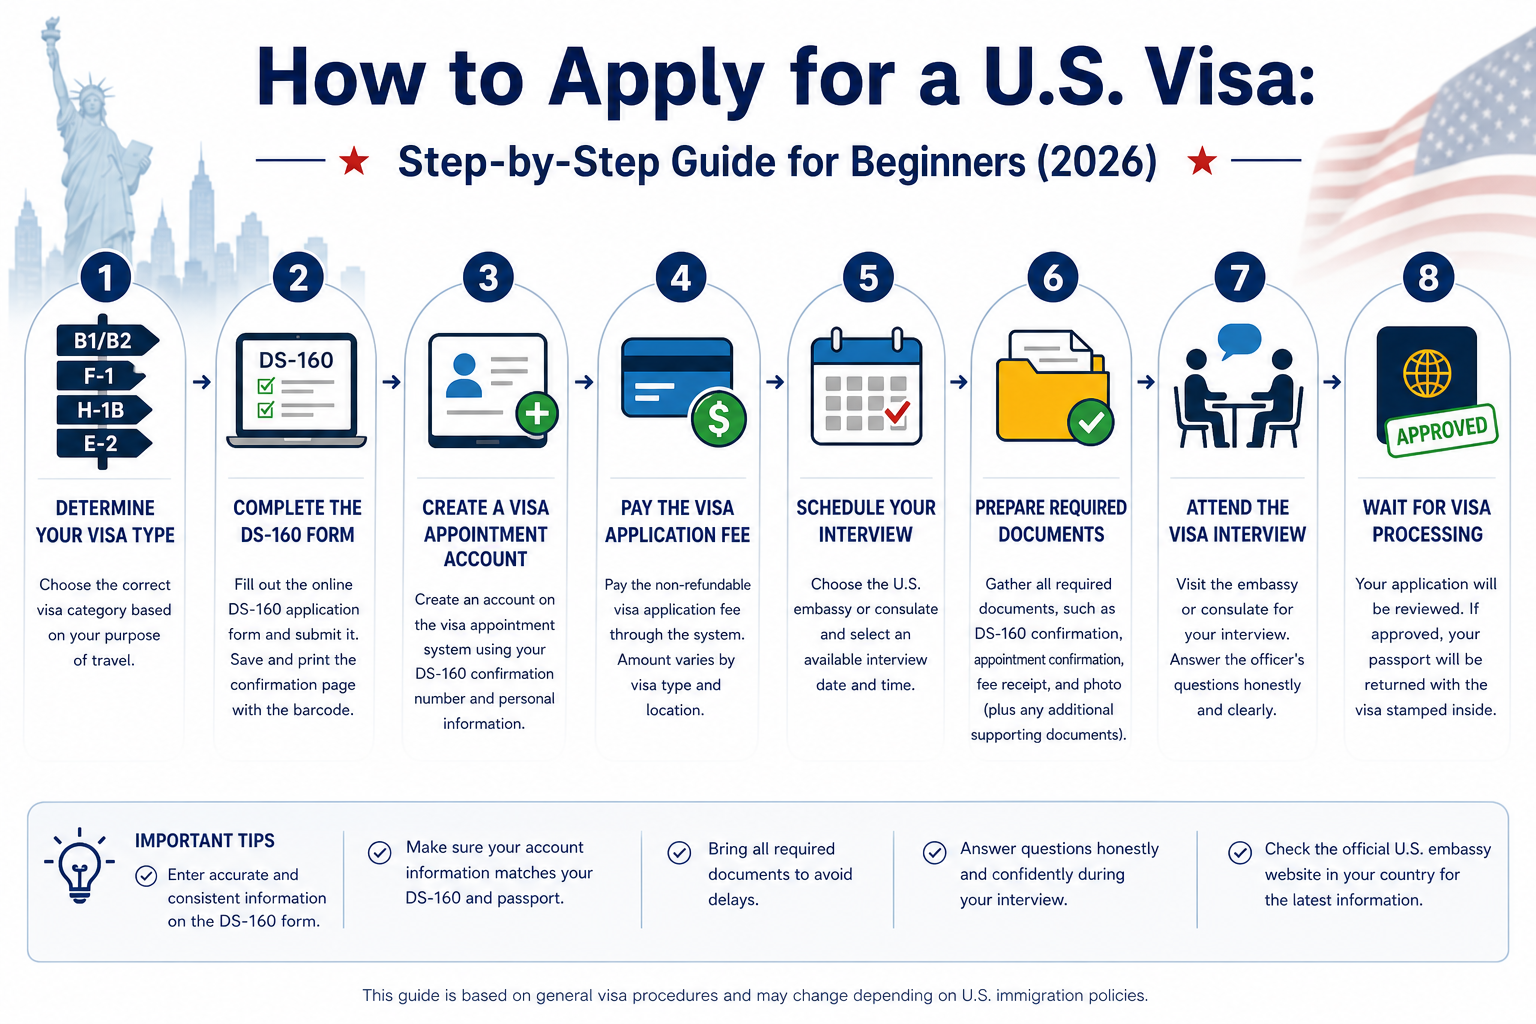
Step 1: Determine Your Visa Type
Before starting your application, you need to identify the correct visa category based on your purpose of travel.
For example:
Tourist or short visits → B1/B2 visa
Study → F-1 visa
Work → H-1B visa
Investment → E-2 visa
Choosing the right visa type is important because each category has different requirements.
Step 2: Complete the DS-160 Form
The DS-160 form is the online application form required for most nonimmigrant visas.
You will need to provide:
Personal information
Travel plans
Employment and education history
Security-related questions
After submitting the form, you will receive a confirmation page with a barcode. You must save and print this page because it will be required later.
Step 3: Create a Visa Appointment Account
After completing the DS-160, you need to create an account on the visa appointment system for the country where you are applying.
During this step, you may need to enter:
Your passport number
DS-160 confirmation number
Personal information
The exact process may vary depending on the country where you apply, so it is important to use the correct visa appointment website.
Step 4: Pay the Visa Application Fee
Once your appointment account is created, you can pay the visa application fee through the system.
The fee amount depends on the visa type. In most cases, the fee is non-refundable, even if your visa is denied.
Payment methods and processing times may vary depending on your location.
Step 5: Schedule Your Interview
After your payment is confirmed, you can schedule your visa interview through your appointment account.
You will choose the U.S. embassy or consulate where you want to attend your interview and select an available appointment date.
Some applicants find this step confusing, especially when appointment availability is limited.
Step 6: Prepare Required Documents
Before your interview, you should prepare the required documents.
These typically include:
Passport
DS-160 confirmation page
Interview appointment confirmation
Visa fee receipt
Photo that meets U.S. visa requirements
Depending on your visa type, you may also need additional supporting documents, such as proof of employment, financial records, or school admission letters.
For certain visa types, such as E-2, applicants may be required to submit supporting documents in advance by email or through a designated system before the interview. In some cases, applicants may also be required to submit hard copies of their documents directly to the U.S. embassy or consulate prior to the interview, depending on the location. Make sure to carefully follow the specific instructions provided by the U.S. embassy or consulate where you are applying.
Step 7: Attend the Visa Interview
On the day of your interview, you will visit the U.S. embassy or consulate.
A consular officer will ask questions about your travel plans, background, and purpose of visit.
The main goal of the interview is to determine whether you meet the visa requirements and whether you intend to return to your home country after your visit.
Dress neatly and present yourself in a professional and respectful manner. During the interview, remain calm, maintain a polite attitude, and try to answer questions with a friendly, confident tone.
Answer honestly and clearly. Short and direct answers are usually best.
Step 8: Wait for Visa Processing
After your interview, your application will be reviewed.
In some cases, the visa is approved shortly after the interview. In other cases, additional administrative processing may be required.
If approved, your passport will be returned with the visa stamped inside.
If your passport delivery takes longer than expected, you can check your visa status online through the official visa status check website:
This allows you to track the progress of your application and see if any additional processing is required.
Common Mistakes to Avoid
Many applicants make simple mistakes that can affect their visa process.
Some common issues include:
Entering incorrect information on the DS-160 form
Creating an appointment account with information that does not match the DS-160 or passport
Paying the fee before understanding the correct process for the country of application
Bringing incomplete documents
Giving unclear or inconsistent answers during the interview
Taking time to prepare properly can help reduce these risks.
Final Thoughts
Applying for a U.S. visa may seem complicated at first, but the process becomes easier once you understand the correct order.
In general, applicants should first determine the correct visa type, complete the DS-160, create an appointment account, pay the visa fee, schedule the interview, and prepare for the interview.
Following the correct order can help reduce confusion and avoid unnecessary delays.
What to Read Next
You may also find it helpful to read:
How to Fill Out Form DS-160 Step-by-Step (2026 Guide)
U.S. Visa Appointment Account Creation
U.S. Visa Application Checklist for First-Time Applicants (2026)
U.S. Visa Interview Tips
These guides can help you better understand each part of the visa application process.
This guide is based on general visa procedures and may change depending on U.S. immigration policies.
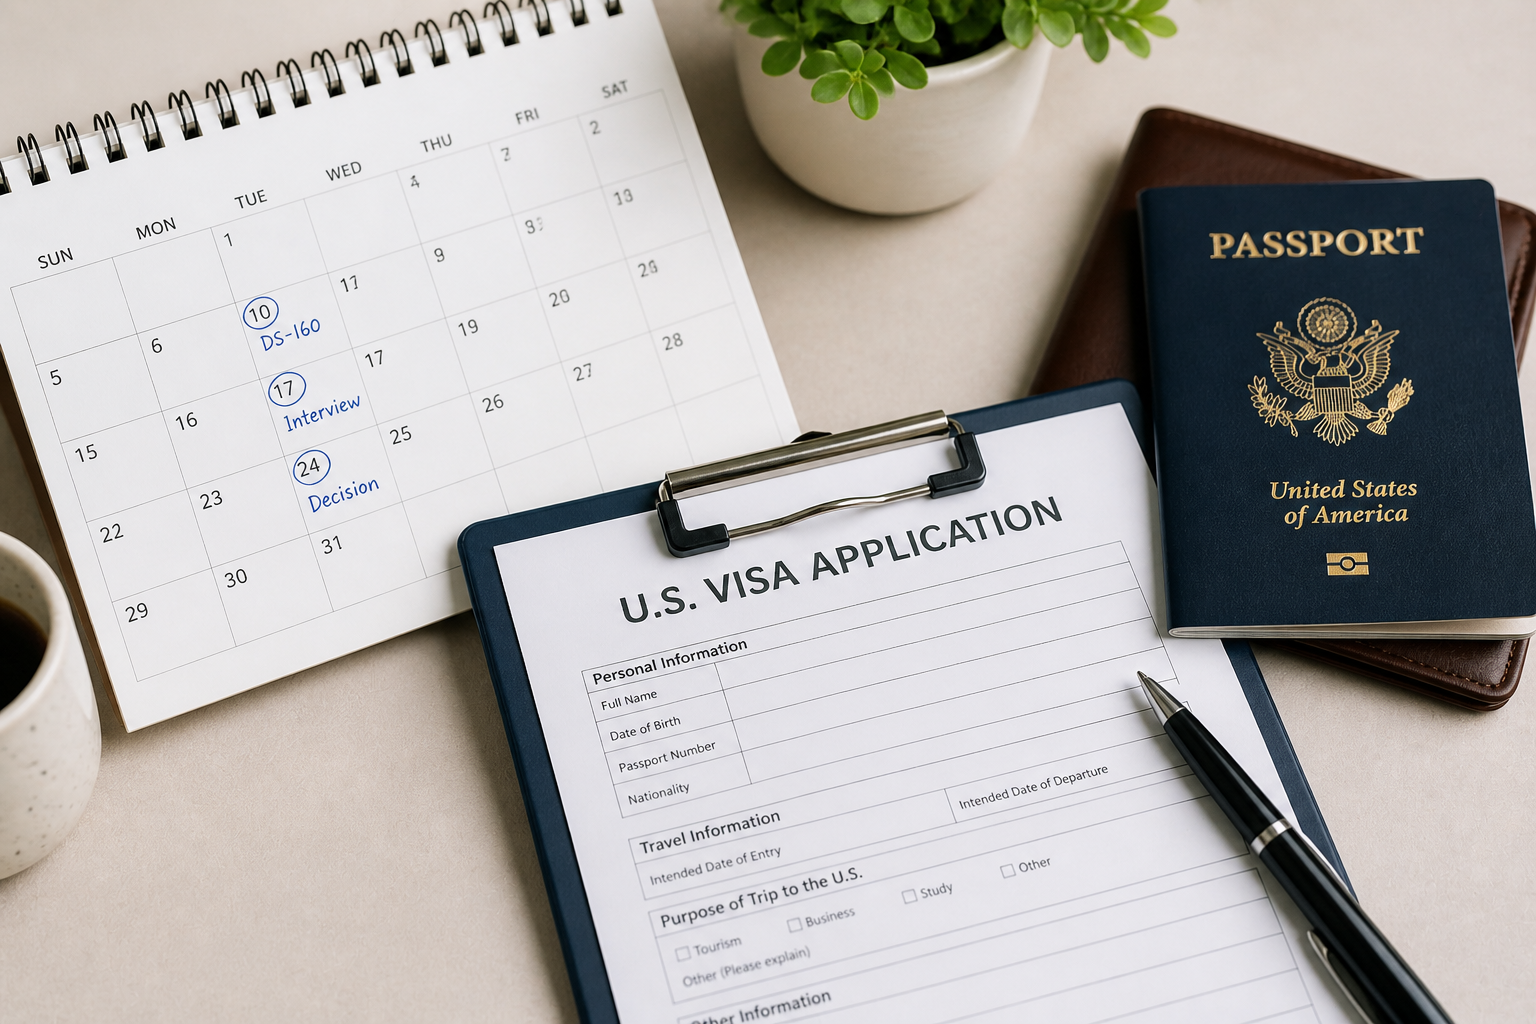
One of the most common questions among visa applicants is how long the process takes.
The answer is not always simple, because U.S. visa processing time can vary depending on several factors, including the visa type and the country where you apply.
This guide explains the general timeline and what you should expect.
Why Processing Time Can Vary
U.S. visa processing time is not fixed.
It can change depending on:
The type of visa
The U.S. embassy or consulate
The time of year
Individual case circumstances
Because of these variables, processing times may differ significantly between applicants.
General Timeline of the Visa Process
While exact timelines vary, most visa applications follow a similar structure.
Step 1: Completing the DS-160 Form
This step depends on the applicant and can usually be completed within a few hours.
Step 2: Scheduling the Interview
The waiting time for an interview appointment can vary widely.
In some locations, appointments may be available within a few days, while in others, it may take several weeks or longer.
Step 3: Attending the Interview
The interview itself is usually brief and completed in one day.
Step 4: Visa Processing After the Interview
After the interview, processing times can vary.
In many cases, visas are issued within a few days. However, some applications may require additional administrative processing, which can take longer.
Average Processing Time
Although it varies, many applicants can expect the process to take anywhere from a few weeks to several months from start to finish.
Shorter timelines are possible in some cases, while longer delays may occur depending on demand and individual circumstances.
Factors That May Cause Delays
Several factors can affect how long your visa takes.
Common reasons for delays include:
High application volume at the embassy
Incomplete or inconsistent information
Additional administrative processing
Seasonal demand (such as peak travel periods)
Understanding these factors can help you better plan your application.
Can You Speed Up the Process?
In most cases, there is no guaranteed way to speed up visa processing.
However, you can reduce delays by:
Providing accurate information
Preparing documents in advance
Scheduling your interview early
Careful preparation can help ensure a smoother process.
Final Thoughts
U.S. visa processing time can vary depending on many factors, but understanding the general timeline can help you plan ahead.
By preparing early and following each step carefully, you can reduce uncertainty and avoid unnecessary delays.
What to Read Next
You may also find it helpful to read:
How to Apply for a U.S. Visa
U.S. Visa Interview Tips
These guides can help you better understand the overall visa process.
This guide is based on general visa information and may change depending on U.S. immigration policies.
Applying for a U.S. visa involves several steps, and it can be easy to miss something if you are not fully prepared.
For first-time applicants, having a clear checklist can make the process much easier. This guide provides a simple and practical checklist to help you stay organized and avoid common mistakes.
Why a Checklist Is Important
The U.S. visa application process includes multiple steps such as completing forms, creating an account, paying fees, and attending an interview.
Missing even a small detail can lead to delays or complications. A checklist helps ensure that you complete each step in the correct order.
Step-by-Step Checklist
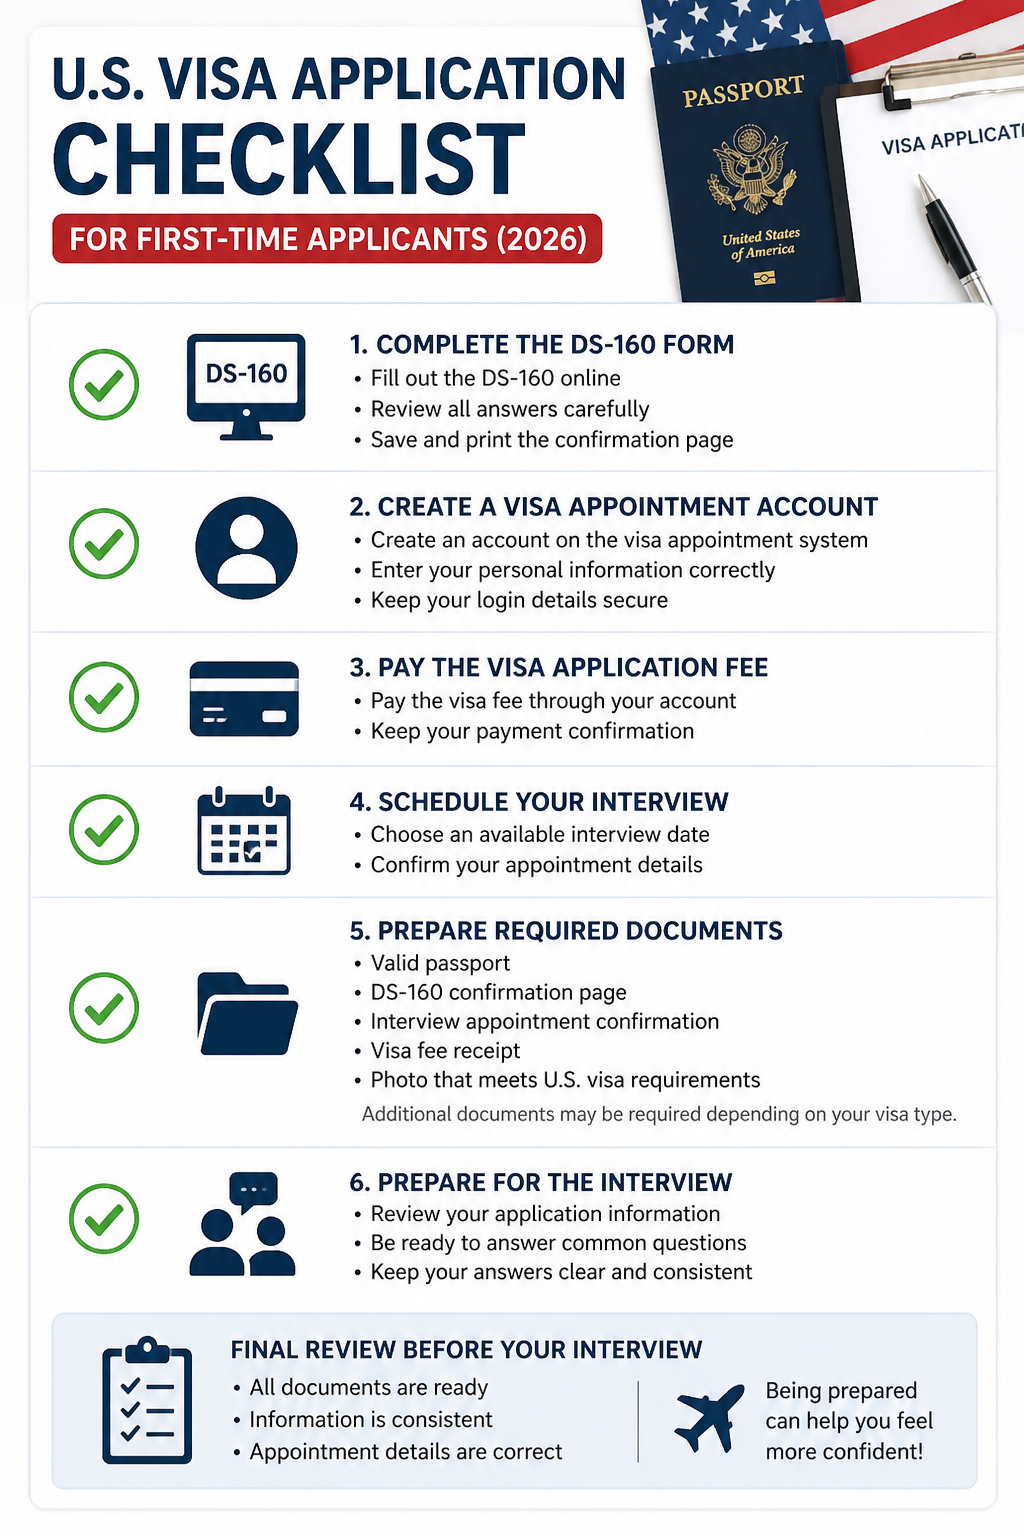
Below is a general checklist for most nonimmigrant visa applications.
✔ Complete the DS-160 Form
Fill out the DS-160 online
Review all answers carefully
Save and print the confirmation page
✔ Create a Visa Appointment Account
Create an account on the visa appointment system
Enter your personal information exactly as shown on your passport
Keep your login details secure
✔ Pay the Visa Application Fee
Pay the visa fee through your account
Keep your payment confirmation
✔ Schedule Your Interview
Select an available interview date
Confirm your appointment details
✔ Prepare Required Documents
Valid passport
DS-160 confirmation page
Interview appointment confirmation
Visa fee receipt
Photo that meets U.S. visa requirements
Additional documents may be required depending on your visa type and personal situation.
✔ Prepare for the Interview
Review your application information
Be ready to answer common questions
Keep your answers clear and consistent
Final Review Before Your Interview
Before your interview day, take a moment to confirm:
All required documents are ready
Your information is consistent
Your appointment details are correct
Being prepared can help you feel more confident during the interview.
Important Note
The exact process and requirements may vary depending on the visa type and the country where you apply. In some cases, applicants may be required to submit documents in advance.
Final Thoughts
The U.S. visa application process may seem complicated at first, but following a clear checklist can make it much more manageable.
By staying organized and completing each step carefully, you can avoid common mistakes and reduce unnecessary stress.
What to Read Next
You may also find it helpful to read:
How to Apply for a U.S. Visa
U.S. Visa Interview Tips
Common Visa Rejection Reasons
These guides can help you better understand the full visa application process and prepare more effectively.
This guide is based on general visa information and may change depending on U.S. immigration policies.
Creating a visa appointment account is an important step in the U.S. visa application process.
Many applicants find this step confusing, especially if they are applying for the first time. However, understanding the basic process can help you avoid unnecessary mistakes.
This guide explains the general steps for creating a U.S. visa appointment account.
Why You Need a Visa Appointment Account
Before scheduling your visa interview, you must create an account on the visa appointment system.
This account is used to:
Pay the visa application fee
Schedule your visa interview
Manage your appointment
Without this account, you cannot proceed with the next steps.
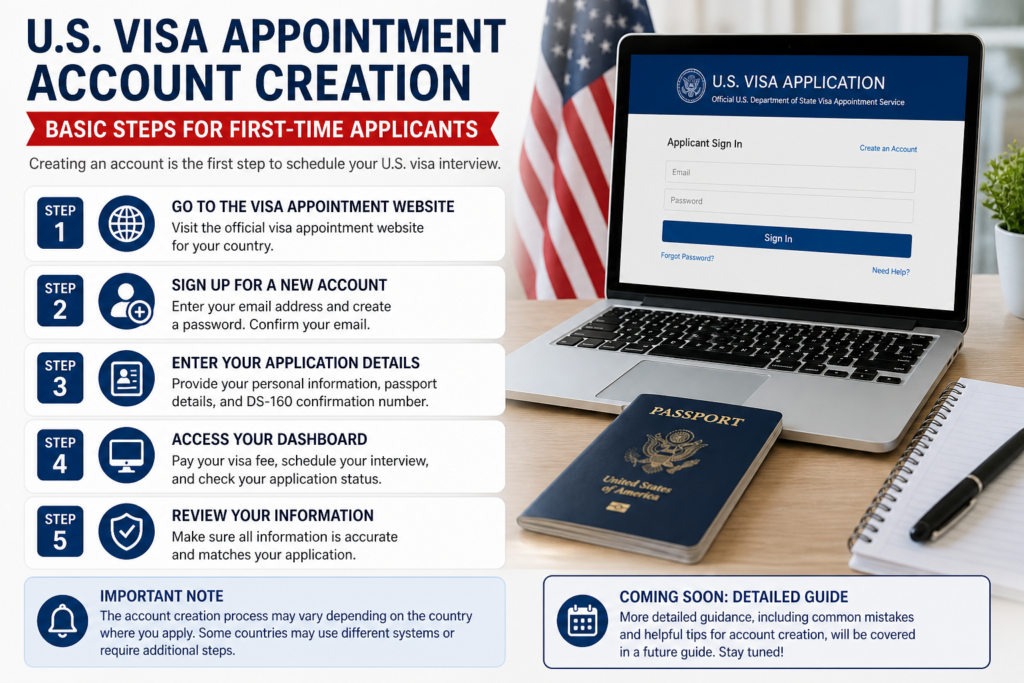
Basic Steps to Create an Account
While the exact process may vary depending on your country, the general steps are similar.
Step 1: Go to the Visa Appointment Website
Visit the official visa appointment website for your country.
Make sure you are using the correct site, as the system may differ depending on your location.
Step 2: Sign Up for a New Account
Create a new account using your email address.
You will be asked to:
Enter your personal information
Create a password
Confirm your email
Step 3: Enter Your Application Details
After creating your account, you will need to enter information related to your visa application.
This may include:
Passport details
DS-160 confirmation number
Personal information
Make sure all information matches your application.
Step 4: Access Your Dashboard
Once your account is set up, you will be able to:
Pay your visa fee
Schedule your interview
Check your application status
Common Issues During Account Creation
Some applicants may experience difficulties during this step.
Common issues include:
Entering incorrect information
Using a different name format than the passport
Problems with email verification
Carefully reviewing your information can help prevent these problems.
Important Note
The account creation process may vary depending on the country where you apply.
Some countries may use different systems or require additional steps.
Final Thoughts
Creating a visa appointment account is a key part of the U.S. visa application process.
While the process may seem confusing at first, following the correct steps can help you complete it without major issues.
More detailed guidance, including common mistakes and helpful tips for account creation, will be covered in a future guide.
What to Read Next
You may also find it helpful to read:
How to Apply for a U.S. Visa
U.S. Visa Interview Tips
U.S. Visa Processing Time
These guides can help you better understand the overall visa process.
This guide is based on general visa information and may change depending on U.S. immigration policies.
Applying for a U.S. visa can feel stressful, especially because many applicants worry about being denied.
While every case is different, there are several common reasons why visas are refused. Understanding these reasons in advance can help you prepare more effectively and avoid unnecessary mistakes.
This guide explains the most common U.S. visa rejection reasons in a clear and simple way.
Why U.S. Visas Get Denied
When you apply for a visa, a consular officer reviews your application and determines whether you meet the requirements.
One of the most important factors is whether you can demonstrate that you will return to your home country after your visit.
If the officer is not convinced, your visa may be denied.
Lack of Strong Ties to Your Home Country
This is one of the most common reasons for visa denial.
“Ties” refer to connections that show you will return home after your trip.
Examples include:
Stable employment
Family relationships
Property or financial commitments
If these ties are unclear or weak, the officer may question your intention to return.
Inconsistent or Incorrect Information
Providing inconsistent information can create serious concerns.
For example:
Differences between your DS-160 form and interview answers
Incorrect personal or employment details
Even small inconsistencies can affect the outcome of your application.
Unclear Travel Purpose
Applicants should be able to clearly explain why they are visiting the United States.
If your purpose of travel is vague or not well explained, the officer may not be able to properly evaluate your case.
Being specific and consistent is important.
Poor Interview Preparation
Some applicants underestimate the importance of the visa interview.
Common issues include:
Not understanding basic questions
Giving long or confusing answers
Appearing uncertain or unprepared
Preparation can help you feel more confident and communicate more clearly.
Insufficient Financial Evidence
Applicants are generally expected to show that they can cover their travel expenses.
If financial information is unclear or not convincing, this may raise concerns.
Previous Visa or Immigration Issues
Past immigration history can also affect your application.
This may include:
Previous visa denials
Overstaying a visa
Violating visa conditions
Each case is reviewed individually, but past issues may be considered.
What Happens After a Visa Denial?
If your visa is denied, you will usually be informed of the reason.
In many cases, the decision is based on specific sections of U.S. immigration law.
A denial does not always mean you cannot apply again. However, it is important to understand the reason before reapplying.
How to Improve Your Chances
While there is no guaranteed way to avoid denial, careful preparation can help.
Some general tips include:
Provide accurate and consistent information
Clearly explain your travel purpose
Prepare for common interview questions
Organize your documents in advance
Taking time to prepare can make a meaningful difference.
Final Thoughts
Visa denials can happen, but understanding the common reasons can help you approach the process more confidently.
By preparing carefully and presenting your information clearly, you can reduce the risk of avoidable mistakes.
What to Read Next
You may also find it helpful to read:
How to Apply for a U.S. Visa
U.S. Visa Interview Tips
Common Visa Rejection Reasons
These guides can help you better understand the full visa application process and prepare more effectively.
This guide is based on general visa information and may change depending on U.S. immigration policies.
If you are planning to visit the United States for tourism, business, or a short personal trip, the B1/B2 visa is one of the most common options.
For many first-time applicants, the process can seem simple, but there are still important details that can cause confusion. Understanding the correct steps and requirements can help you prepare more effectively.
This guide explains the B1/B2 visa in a clear and practical way.
What Is a B1/B2 Visa?
The B1/B2 visa is a nonimmigrant visa that allows individuals to enter the United States for a temporary stay.
It combines two categories:
B1 visa – for business-related activities
B2 visa – for tourism and personal visits
In most cases, applicants receive a combined B1/B2 visa.
What Can You Do with a B1/B2 Visa?
The B1/B2 visa is intended for short-term visits.
Common purposes include:
Tourism and sightseeing
Visiting family or friends
Attending business meetings or conferences
Receiving medical treatment
It is important to note that employment is not permitted under this visa.
Basic Requirements for a B1/B2 Visa
To qualify for a B1/B2 visa, applicants generally need to demonstrate that they:
Plan to stay in the U.S. temporarily
Have a clear purpose of travel
Have sufficient financial resources
Intend to return to their home country
The most important factor is showing strong ties to your home country.
How to Apply for a B1/B2 Visa
The application process follows the standard U.S. visa procedure, but it is important to follow the correct order.
Step 1: Complete the DS-160 Form
You must fill out the DS-160 online application form and submit it before moving forward.
After submission, you will receive a confirmation page with a barcode. You must save and print this page.
Step 2: Create an Account on the Visa Appointment System
After completing the DS-160, you need to create an account on the visa appointment system.
During this step, you will enter your personal information, passport details, and DS-160 confirmation number.
This account will be used for paying the visa fee and scheduling your interview.
The exact process may vary depending on the country where you apply.
Step 3: Pay the Visa Application Fee
Once your account is created, you can pay the visa application fee through the system.
Payment methods and processing times may vary depending on your location.
Step 4: Schedule Your Interview
After your payment is confirmed, you can log into your account and schedule your visa interview at the U.S. embassy or consulate.
Step 5: Attend the Interview
During the interview, a consular officer will ask questions about your travel plans and background.
The main goal is to determine whether you meet the visa requirements and whether you intend to return to your home country after your visit.
Documents You May Need
Applicants are typically required to bring:
Valid passport
DS-160 confirmation page
Interview appointment confirmation
Visa fee receipt
Photo that meets visa requirements
Additional documents may be requested depending on your situation.
How Long Can You Stay?
The length of stay is not determined by the visa itself.
Even if your visa is valid for several years, the actual length of stay is decided by the officer at the port of entry.
In many cases, visitors may be allowed to stay for up to six months, but this can vary.
Common Mistakes to Avoid
Many applicants make simple mistakes that can affect their visa outcome.
Some common issues include:
Providing inconsistent information
Not preparing properly for the interview
Failing to demonstrate ties to their home country
Careful preparation can help reduce these risks.
Final Thoughts
The B1/B2 visa is one of the most widely used U.S. visas and is often the first step for travelers visiting the United States.
While the process is straightforward, understanding each step and preparing properly can help you avoid unnecessary delays or complications.
What to Read Next
After learning about the B1/B2 visa, the next step is preparing for your visa interview.
In the next guide, we will explain common visa interview questions and how to prepare effectively.
This guide is based on general visa information and may change depending on U.S. immigration policies.