If you are planning to travel to the United States, one of the most important steps is applying for the correct visa. For many first-time applicants, the process can feel confusing because there are several steps involved.
The good news is that the U.S. visa application process follows a general structure. Once you understand each step, the process becomes much easier to manage.
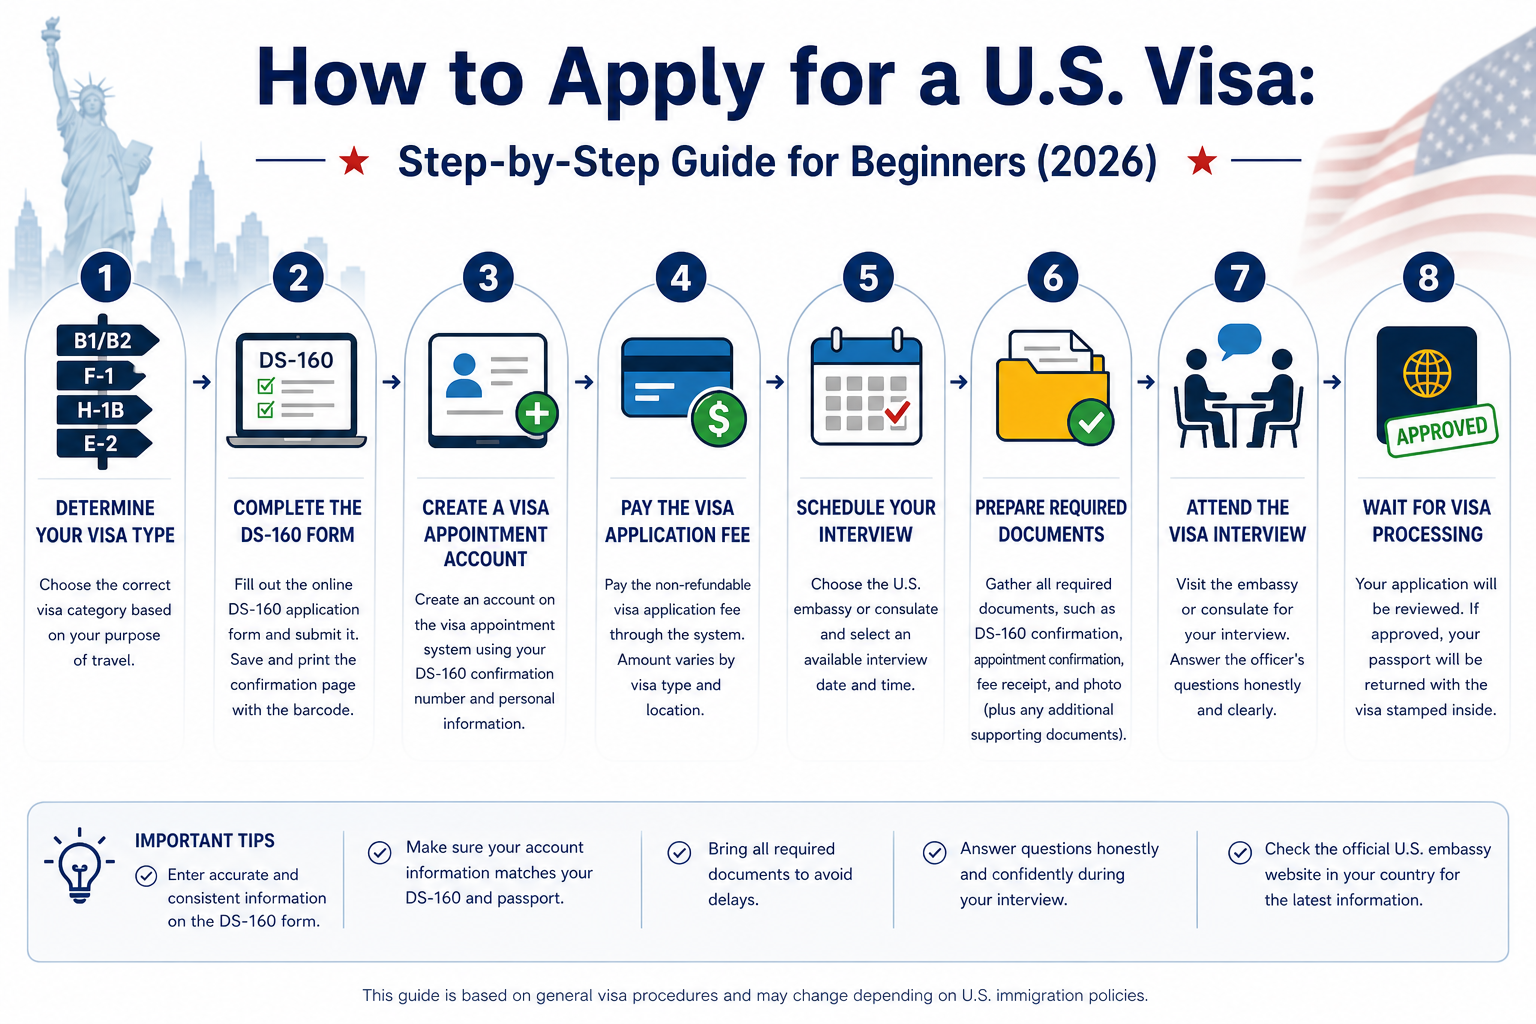
This guide explains how to apply for a U.S. visa in a simple, step-by-step format.
Step 1: Determine Your Visa Type
Before starting your application, you need to identify the correct visa category based on your purpose of travel.
For example:
Tourist or short visits → B1/B2 visa
Study → F-1 visa
Work → H-1B visa
Investment → E-2 visa
Choosing the right visa type is important because each category has different requirements.
Step 2: Complete the DS-160 Form
The DS-160 form is the online application form required for most nonimmigrant visas.
You will need to provide:
Personal information
Travel plans
Employment and education history
Security-related questions
After submitting the form, you will receive a confirmation page with a barcode. You must save and print this page because it will be required later.
Step 3: Create a Visa Appointment Account
After completing the DS-160, you need to create an account on the visa appointment system for the country where you are applying.
During this step, you may need to enter:
Your passport number
DS-160 confirmation number
Personal information
The exact process may vary depending on the country where you apply, so it is important to use the correct visa appointment website.
Step 4: Pay the Visa Application Fee
Once your appointment account is created, you can pay the visa application fee through the system.
The fee amount depends on the visa type. In most cases, the fee is non-refundable, even if your visa is denied.
Payment methods and processing times may vary depending on your location.
Step 5: Schedule Your Interview
After your payment is confirmed, you can schedule your visa interview through your appointment account.
You will choose the U.S. embassy or consulate where you want to attend your interview and select an available appointment date.
Some applicants find this step confusing, especially when appointment availability is limited.
Step 6: Prepare Required Documents
Before your interview, you should prepare the required documents.
These typically include:
- Passport
- DS-160 confirmation page
- Interview appointment confirmation
- Visa fee receipt
- Photo that meets U.S. visa requirements
Depending on your visa type, you may also need additional supporting documents, such as proof of employment, financial records, or school admission letters.
For certain visa types, such as E-2, applicants may be required to submit supporting documents in advance by email or through a designated system before the interview. In some cases, applicants may also be required to submit hard copies of their documents directly to the U.S. embassy or consulate prior to the interview, depending on the location. Make sure to carefully follow the specific instructions provided by the U.S. embassy or consulate where you are applying.
Step 7: Attend the Visa Interview
On the day of your interview, you will visit the U.S. embassy or consulate.
A consular officer will ask questions about your travel plans, background, and purpose of visit.
The main goal of the interview is to determine whether you meet the visa requirements and whether you intend to return to your home country after your visit.
Dress neatly and present yourself in a professional and respectful manner. During the interview, remain calm, maintain a polite attitude, and try to answer questions with a friendly, confident tone.
Answer honestly and clearly. Short and direct answers are usually best.
Step 8: Wait for Visa Processing
After your interview, your application will be reviewed.
In some cases, the visa is approved shortly after the interview. In other cases, additional administrative processing may be required.
If approved, your passport will be returned with the visa stamped inside.
If your passport delivery takes longer than expected, you can check your visa status online through the official visa status check website:
https://ceac.state.gov/ceacstattracker/status.aspx
This allows you to track the progress of your application and see if any additional processing is required.
Common Mistakes to Avoid
Many applicants make simple mistakes that can affect their visa process.
Some common issues include:
Entering incorrect information on the DS-160 form
Creating an appointment account with information that does not match the DS-160 or passport
Paying the fee before understanding the correct process for the country of application
Bringing incomplete documents
Giving unclear or inconsistent answers during the interview
Taking time to prepare properly can help reduce these risks.
Final Thoughts
Applying for a U.S. visa may seem complicated at first, but the process becomes easier once you understand the correct order.
In general, applicants should first determine the correct visa type, complete the DS-160, create an appointment account, pay the visa fee, schedule the interview, and prepare for the interview.
Following the correct order can help reduce confusion and avoid unnecessary delays.
What to Read Next
You may also find it helpful to read:
How to Fill Out Form DS-160 Step-by-Step (2026 Guide)
U.S. Visa Appointment Account Creation
U.S. Visa Application Checklist for First-Time Applicants (2026)
U.S. Visa Interview Tips
These guides can help you better understand each part of the visa application process.
This guide is based on general visa procedures and may change depending on U.S. immigration policies.